Luigi's Box IdoSell Integration Guide
Overview
Section titled “Overview”This guide walks you through integrating Luigi’s Box with your IdoSell store. The integration enables:
- Search - AI-powered product search with typo tolerance and synonyms
- Product Recommendations - Personalized product suggestions
- Analytics - Insights into customer search behavior
- Automatic Data Sync - Your catalog stays up-to-date with Luigi’s Box
Time to Complete: 15-20 minutes Prerequisites: Admin access to IdoSell, Luigi’s Box account
Expert Quickstart (TL;DR) — Click to expand
1. Generate API Key (IdoSell):
- Go to Settings → API → Access
- Create new key with System, CMS, PIM: Read only
- Copy the API Key and save it for Phase 4
2. Create Sites (Luigi's Box):
- Create a new site for each language/shop in your IdoSell
- Each site gets its own Script ID (LBX-xxxxxx)
3. Install Tracking Scripts (IdoSell):
- Create HTML/JS campaign named LuigisBox
- Paste the correct Script ID in each language tab
4. Activate Sync (Email Support):
- Email your API Key to support@luigisbox.net
- Catalog syncs automatically after confirmation
Common Gotchas:
- Multi-Language: Each language needs its own Site with unique Script ID
- Wrong Script Tab: Paste English script in [English] tab, German in [German] tab
- Permissions: System, CMS & PIM must all be "Read only"
Phase 1: Generate IdoSell API credentials
Section titled “Phase 1: Generate IdoSell API credentials”Before connecting Luigi’s Box, you need to generate a secure API Key in your IdoSell administration panel.
Step 1: Navigate to API settings
Section titled “Step 1: Navigate to API settings”- Log in to your IdoSell administration panel
- Navigate to Settings → API → Access (Ustawienia → API → Dostęp)
- Click Add New Key (Dodaj klucz)
Step 2: Configure key settings
Section titled “Step 2: Configure key settings”You will see a form titled “Adding an API key” (Dodawanie klucza API). Configure the fields as follows:
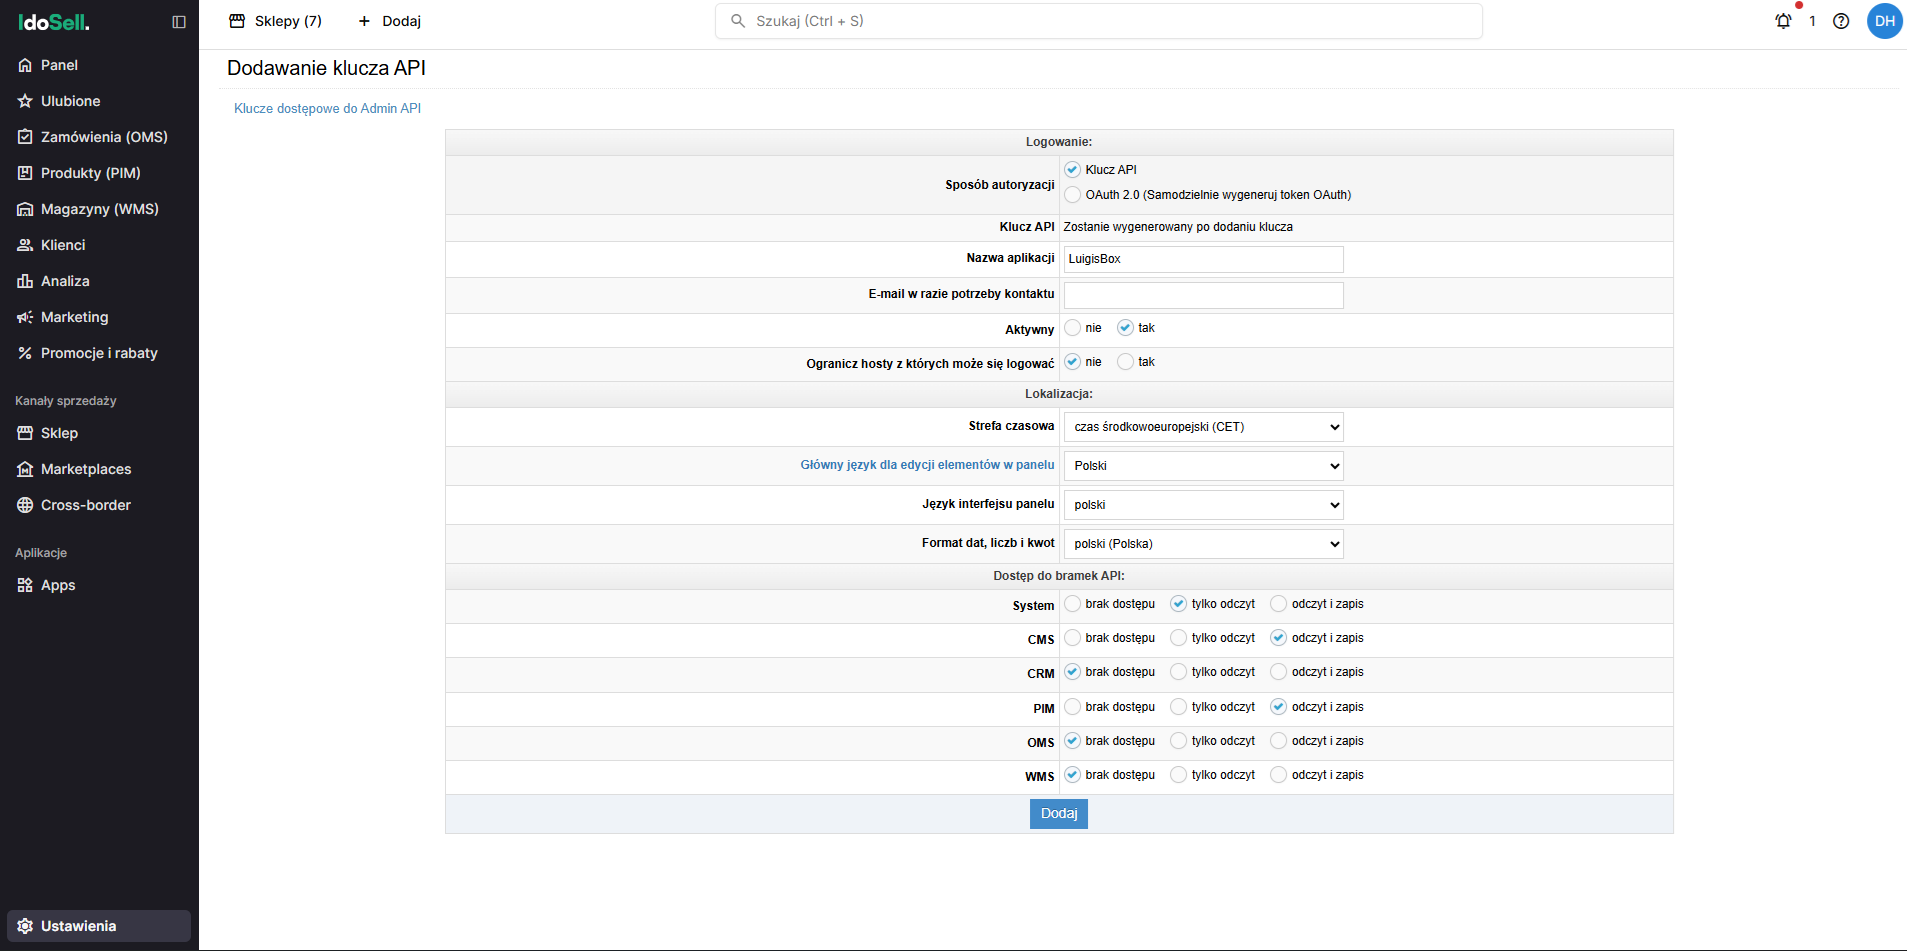
Login Settings (Logowanie):
- Authorization Method (Sposób autoryzacji): Select API Key (Klucz API)
Key Details:
- API Key (Klucz API): Will be generated automatically after you save
- Application Name (Nazwa aplikacji): Enter
LuigisBox - Email in case of contact necessity (E-mail w razie potrzeby kontaktu): Optional
Status:
- Active (Aktywny): Set to Yes (tak)
- Restrict hosts from which login is possible (Ogranicz hosty z których moze sie logowac): Set to No (nie)
Localization (Lokalizacja):
- Leave default settings (usually CET timezone and Polish language)
Step 3: Configure API gateway permissions (Dostep do bramek API)
Section titled “Step 3: Configure API gateway permissions (Dostep do bramek API)”Scroll down to the permissions matrix and set the following:
| Gateway | Permission Level | Polish Label |
|---|---|---|
| System | Read only | tylko odczyt |
| CMS | Read only | tylko |
| PIM | Read only | tylko |
| CRM | No access | brak dostępu |
| OMS | No access | brak dostępu |
| WMS | No access | brak dostępu |
Step 4: Save and copy
Section titled “Step 4: Save and copy”- Click Add (Dodaj) at the bottom of the form
- The page will reload, and your API Key (Klucz API) will now be visible in the top section
- Copy this key to your clipboard. You will need it in Phase 4.
Phase 2: Create project and sites
Section titled “Phase 2: Create project and sites”In this phase, you will create your Luigi’s Box account structure.
Step 1: Create your first project and site
Section titled “Step 1: Create your first project and site”When you log in to Luigi’s Box for the first time, you will see the Create a new site/project form:
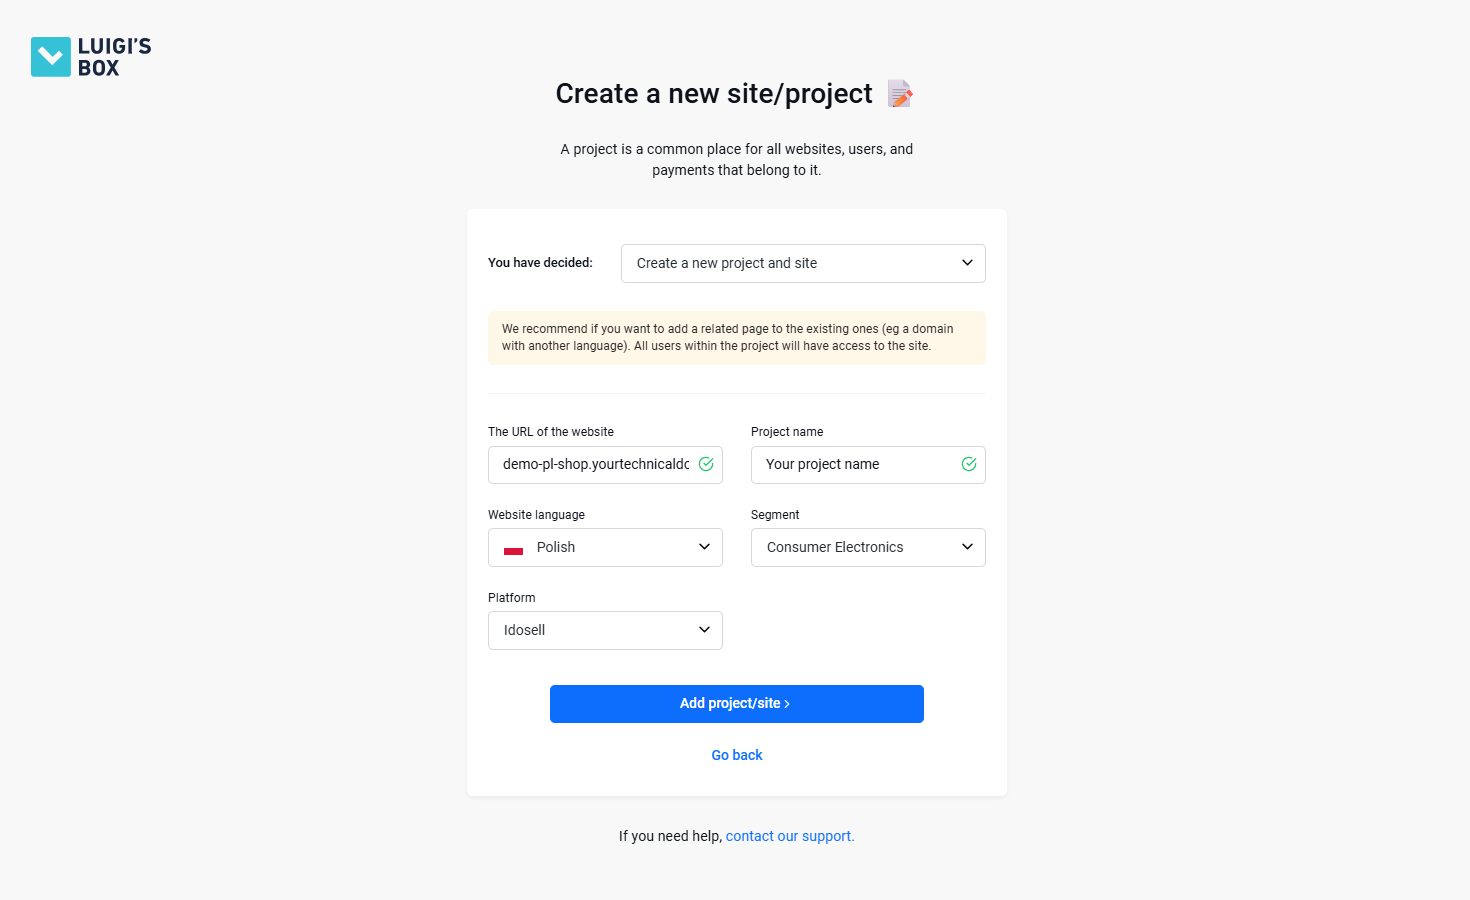
- You have decided: This dropdown is automatically set to Create a new project and site
- Fill in the form:
- URL: Enter your store’s URL (e.g.,
myshop.com) - Website language: Select the language for this specific view (e.g., English)
- Platform: Select IdoSell
- Project name: Enter a name of your choosing (e.g.,
My Store) - Segment: Select your e-commerce segment (e.g., Fashion, Electronics, etc.)
- URL: Enter your store’s URL (e.g.,
- Click Add project/site
Your first Project and Site are now created!
Step 2: Add additional languages/shops
Section titled “Step 2: Add additional languages/shops”If you have other languages (e.g., German) or other domains managed in the same IdoSell panel:
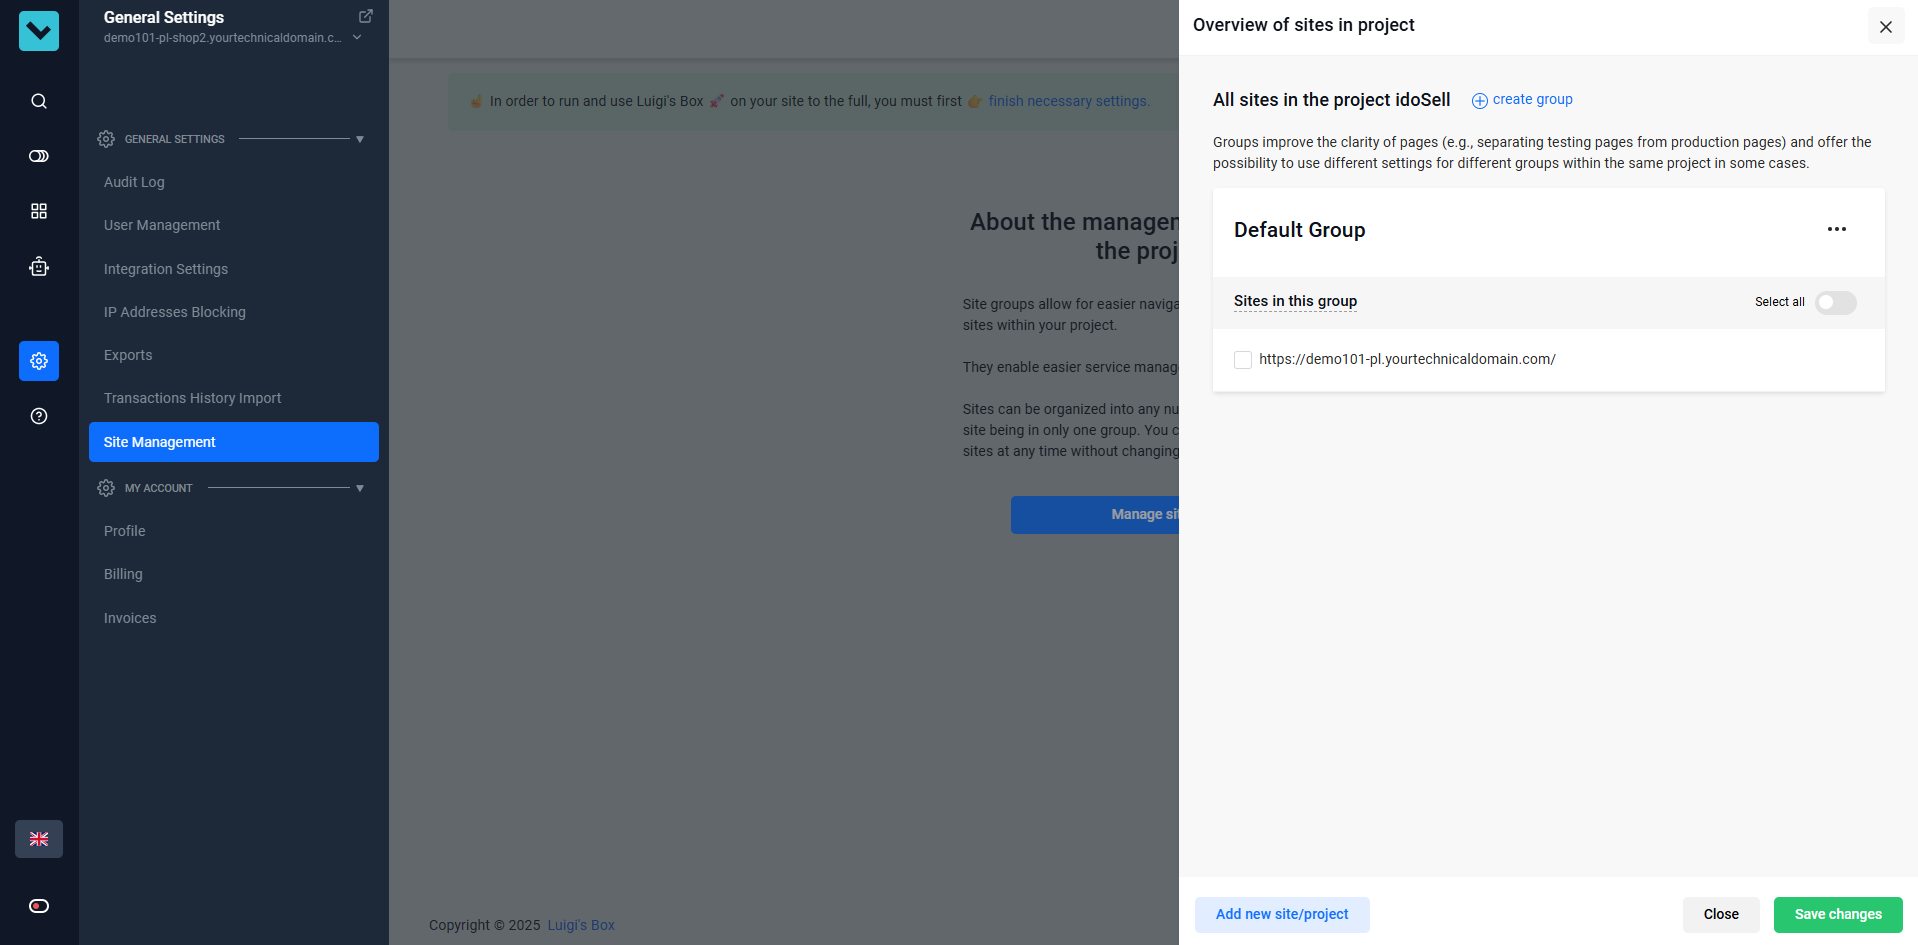
-
In Luigi’s Box App navigate to General Settings → Site Management (as shown in the image above)
-
A menu appears on the right side of the screen
-
Click Add new site/project button
-
The same form as in Step 1 appears with the You have decided dropdown automatically set to Add a new site to an existing project
- If you want to create a separate project instead, change this to Create a new project and site
-
Fill in the form:
- URL: Enter the URL (same as Step 1 if it’s just a language subfolder, or different if it’s a new domain)
- Website language: Select the new language (e.g., German)
- Platform: Automatically selected as IdoSell
- Name: Enter a descriptive name for this site (e.g.,
My Store - German) - Assign to project group: Select Default Group (if you haven’t created custom groups yet)
- Segment: Automatically selected and cannot be changed (inherited from the project)
-
Click Add project/site
-
Repeat this process for every active language you have
Phase 3: Install tracking scripts
Section titled “Phase 3: Install tracking scripts”Now you will install the tracking scripts so Luigi’s Box can start analyzing traffic.
Step 1: Prepare your tracking scripts
Section titled “Step 1: Prepare your tracking scripts”You should already have your tracking scripts from Phase 2. If you need to retrieve them again:
- In your Luigi’s Box Dashboard, go to Settings → Site Management
- You will see a list of all sites you created (e.g., “Shop - English”, “Shop - German”)
- Each site displays its Tracking Script with the unique Script ID (e.g.,
LBX-xxxxxx)
Step 2: Create IdoSell campaign
Section titled “Step 2: Create IdoSell campaign”- Log in to IdoSell
- Navigate to Store → Optimization & Functionality → HTML/JS Add-ons (Sklep → Optymalizacja i funkcjonalnosc → Dodatki HTML/JS)
- Click Add a campaign (Dodaj kampanie)
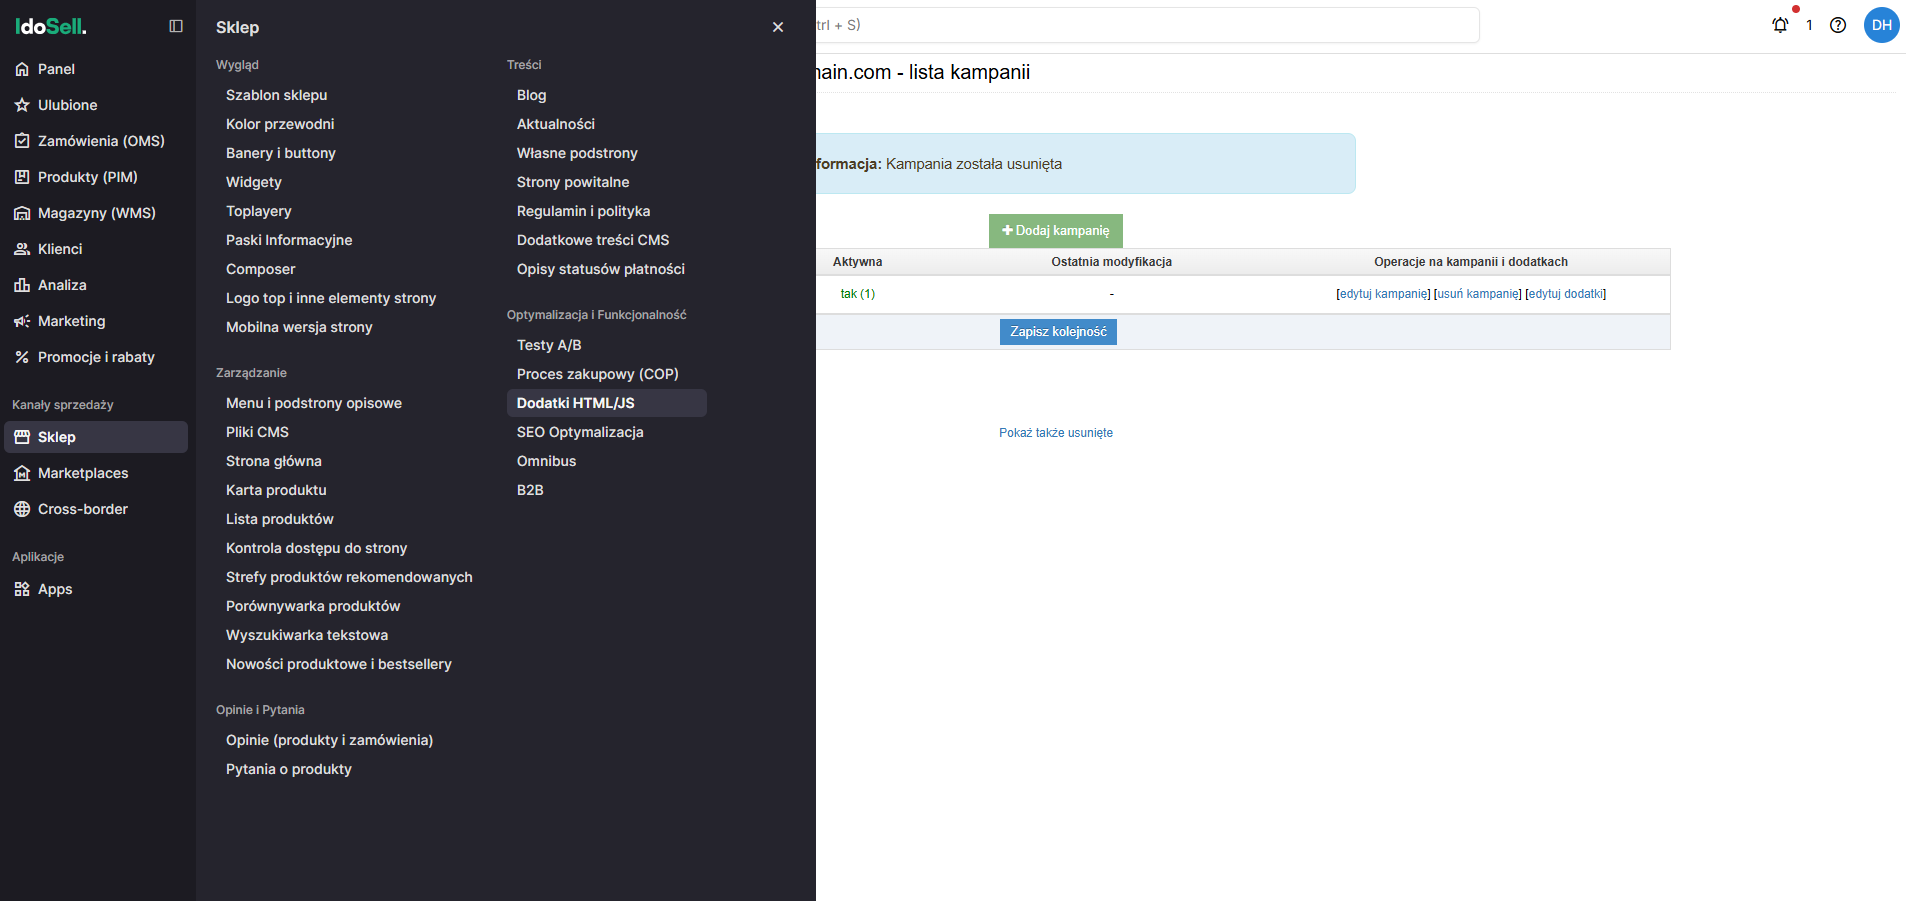
Campaign Settings:
- Name:
LuigisBox - Active: Yes
- Pages: Select the pages where you want the script to run
- For single-store setups: Select All pages (Wszystkie strony)
- For multi-store setups: Select only the pages relevant to the current store/domain using the checkboxes
- Click Save
Step 3: Add script and handle languages
Section titled “Step 3: Add script and handle languages”- Edit your new campaign and click New addition (Dodaj nowy dodatek)
- Configure the settings:
- Type: HTML
- Load: Along with page content
- Show: Normal version AND Mobile version
![]()
Step 4: Insert code
Section titled “Step 4: Insert code”For Single-Language Stores:
Simply paste your tracking script in the code editor:
<script src="https://scripts.luigisbox.tech/LBX-YOUR-ID.js"></script>Click Add (Dodaj)
For Multi-Language Stores:
-
Click the [English] Tab → Paste your English tracking script:
<script src="https://scripts.luigisbox.tech/LBX-YOUR-ENGLISH-ID.js"></script> -
Click the [German] Tab → Paste your German tracking script:
<script src="https://scripts.luigisbox.tech/LBX-YOUR-GERMAN-ID.js"></script> -
Repeat for all language tabs, ensuring each has its correct unique script
-
Click Add (Dodaj)
Phase 4: Activate catalog sync
Section titled “Phase 4: Activate catalog sync”To finalize the connection and begin syncing your products, please email your Luigi’s Box representative (or support@luigisbox.net) with the following:
Subject: IdoSell API Configuration - [Your Company Name]
Body:
- The API Key you generated in Phase 1
- Confirmation that you have created the sites in the dashboard
- Your IdoSell store URL(s)
What happens next
Section titled “What happens next”Our team will securely configure your API Key in our backend. Once confirmed (usually within 24 hours), your product catalog will begin syncing automatically every 3 hours.
You will receive a confirmation email when the sync is active.
Verification and troubleshooting
Section titled “Verification and troubleshooting”Verify script installation
Section titled “Verify script installation”To confirm the tracking script is working:
- Open your IdoSell store homepage in a new browser tab
- Right-click and select View Page Source
- Search (Ctrl+F / Cmd+F) for
luigisbox
You should see the script injected within the code:
<!-- Begin additional html or js --><!--7|1|6--><script src="https://scripts.luigisbox.tech/LBX-xxxxxx.js"></script><!-- End additional html or js -->For Multi-Language: Check each language version of your site to ensure the correct Script ID appears for each language.
Verify catalog sync status
Section titled “Verify catalog sync status”After receiving confirmation from support (Phase 4):
- Go to your Luigi’s Box Dashboard
- Navigate to Catalog → Browser
- You should see your products appearing within 3-6 hours of the initial sync
Next steps
Section titled “Next steps”- Wait for Initial Sync: Your catalog is now syncing. This typically takes 15-60 minutes depending on catalog size
- Check Catalog: Go to Catalog → Browser in Luigi’s Box to confirm products are appearing
- Configure Search: Once synced, you can begin configuring search rules and recommendations
Implement your features
Section titled “Implement your features”Once your catalog is synced, you can implement Luigi’s Box features on your storefront:
- Implement Search: Activate and configure your new search bar
- Implement Recommendations: Add personalized “cross-sell” and “upsell” carousels to your product and cart pages
- Implement Product Listings: Power your category pages with Luigi’s Box for smart filtering and faceting
Was this page helpful?
Thanks.